Monday, June 23, 2014

ISTE Tips!

That magical time of year is almost upon us. It's every edtech enthusiast's dream. I now understand why people go to ComicCon, the Olympics, the World Cup, any large event with thousands of spectators - camaraderie! ISTE is that for educators who embrace instructional technology.

I highly recommend the following posts by other educators.

A Nerdy Teacher's Guide to ISTE by @thenerdyteacher
Daring Conference Packing Tips & Tricks by @gwynethjones
ISTE for Newbies by @kcalderw

And after you read their tips, you should connect with them on Twitter! They'd love to connect with you!

Here are some of my tips and tricks for attending ISTE.

1. Bring a water bottle, a coffee mug & a power strip.
I usually carry around coffee and/or water at the office, so a conference is no different! Plus, who wants to pay for water when you could get it for free? Same goes for coffee from the hotel in the morning. Power strips are a great way to network too. Power strips at a tech conference can make you more popular than an Apple product.

2. Wear comfy shoes.
I am a fan of my Chacos. They have climbed mountains. They can help me at climb ISTE. Make sure your shoes are comfy because you will be walking A LOT.

3. Dress in layers and dress for comfort.

Conference centers are notoriously cold. Wear layers and you'll be fine. Plus, ISTE tends to be somewhere hot, so you may not need a sweater whilst trekking to the conference center, but it will be frigid once you enter. Also, I have seen some presenters in bow ties and some presenters in golf shirts. Atlanta will be HOT. And humid. Dress accordingly.

4. Have room for swag.


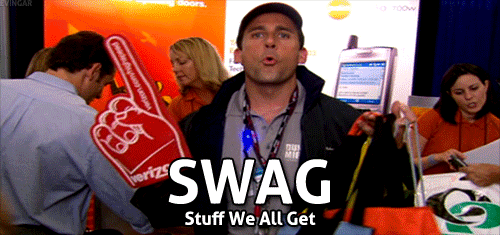
Michael Scott was right. Swag originally stood for "Stuff We All Get". It's at the Oscars, it's on Oprah's show, and it's quite plentiful at ISTE. Make sure you have room to accommodate all the swag you accumulate. Keep in mind if you are flying that you may have to pay for an extra bag. Last year, I got loads of swag that I used for door prizes in my schools for the following year.

5. Take time to connect.
The best part of ISTE is meeting other people like you - educators passionate about instruction, whether it uses technology or not. Now is the time to connect with people you never met face to face. Some of my favorite moments at ISTE 13 were when I connected with tweeps. Relationships are what it is all about, after all.

6. Take time for yourself.
Being an introvert (yes, me, an introvert), I like to take time to unplug. Often. ISTE will be overwhelming. Your brain will get overloaded. So make sure you schedule downtime. It's ok to not completely fill your schedule with sessions to attend. And make sure you get enough rest. ISTE is a lot of information and a lot of people in a small amount of time and space. I also like to run, so I will be treadmilling my miles

7. Use the law of two feet.
Edcamps have changed educators for the better. Edcamp follows the law of two feet - go where you can learn. If you are not learning something in the session you are attending, go somewhere else! I left a paid workshop last year and went to ISTEUnplugged/HackEd instead. It was GREAT! I arrived just in time for the smackdown. I am looking forward to ISTEUnplugged/HackEd this year. Y'all come go with us!

8. Create an ISTE app page on your device or smartphone.
I have one screen on my phone with shortcuts to apps I will need during ISTE including:
  • iPadio for recording audio reflections or notes from sessions
  • Eventbrite for tickets to after ISTE events
  • Google Maps for figuring out how to get around
  • Voxer for sending walkie talkie messages to friends at ISTE
  • Evernote & Google Docs for notes
  • Google Sheets for my personal spreadsheet of all ISTE events
  • QR Droid for reading QR codes
  • Overdrive for reading during downtime
  • Pandora for listening to music during downtime
  • and, of course, Twitter for tweeting!

9. Use ISTE app to build your schedule.
Yes, I created a Google Sheet with dates, times, locations and descriptions of each event I am attending while in Atlanta for ISTE. However, I started building my schedule for ISTE through the ISTE app. It's a great resource! There is even a game for you to play and get points through the ISTE app! Find the app here.

10. Above all else, charge your device whenever you can!
During the conference, I will pack my backpack with my chromebook, tablet and phone. Take the chance to charge your devices whenever you can. I remember someone charging their phone last year during dinner. Bring your power cord with you wherever you go. It is perfectly acceptable to charge a device during a meal.

This is not an exhaustive list, but hopefully it's enough to help you ponder the ISTE experience and begin packing. If you have any questions, feel free to tweet me @theprofspage! I look foward to learning at #ISTE2014 with you! 


Melinda Sears is the Title I Instructional Technology Coordinator for the Tuscaloosa City Schools. Check out her website or connect with her via Twitter.  

Thursday, February 27, 2014

Google Apps FAQ

This week, TCS secondary language arts folks got together and allowed me to geek out with them by sharing some info about Google apps.  In an effort to make the session more meaningful for attendees, I requested that teachers share their questions and Google-related classroom issues prior to the meeting, and some great questions came rolling in.  Here, for the purpose of future reference, are some of the most common questions and the responses shared.

Why Google apps?
In her book, It's Complicated: The Social Lives of Networked Teens, danah boyd outlines certain affordances offered by networked social environments:
  • persistence: the durability of online expressions and content
  • visibility: the potential audience who can bear witness
  • spreadability: the ease with which content can be shared
  • searchability: the ability to find content.
While the focus of boyd's discussion is social media, it's useful to note that these traits also apply to the tools at our disposal through our system's Google Apps for Education domain.  Student-created content can remain in a single, easy-to-access online spot for years, following kids from grade to grade and facilitating the process of building student portfolios and other means of collecting and viewing evidence of student learning over time.  Viewing and sharing documents of all sorts is fairly simple, which leads to potential for easier and better collaboration and feedback for students.  Finally, Google has become synonymous with search - locating information within student documents or folders is just a CTRL-F away.

What do I do when all the screens in my room say "Google Drive is unreachable"?
Google apps and our system's filter sometimes don't get along.  To avoid this problem, students and teachers should log in to iBoss before beginning work in Google Drive or other Google tools.  Here's a quick link to the login page: bit.ly/tcsiboss.  It might be helpful to bookmark it for easy future access.

How do I set up student collaboration from a shared template?
There may be documents that you want to be able to distribute electronically to students - a lab report or a major work data sheet, for example.  The first step is to create the document itself or to upload a document you already have (i.e. a Word document).  Once you've got the document in your own Google Drive, you must decide how to share it.  Chances are you'll share more than one document over the course of  a school year, so the best bet is to create a folder to house them all.  Name it, then click the Share button and allow anyone with the link to have Can View rights.  Give your students the link to the folder, and they can access all of the documents you place within it without being able to edit the originals.  When a student opens a document they wish to edit, they can make a copy (an option under File in Google Docs) to save in their own Google Drive, ensuring that they have a template to work from and your originals remain clean.   

How do students save to a flash drive for editing at home?
My initial thought on this is that students and teachers should start leaning on cloud resources like Google Drive so that they don't have to carry around flash drives anymore.  Google Drive and the items created within it are accessible from anywhere you've got an internet connection (and at least a browser or Drive app), so it's not necessary to haul physical media from school to home and back.  However, if students still wish to work outside of Google Drive at home, they can download their files (saving them as Word, PowerPoint, PDF, or other file types) and save them to a flash drive.  Please note that, once students return to school, they will need to upload the changed files back into Google Drive.

How can students submit assignments to their teacher?
This question leads us into workflow territory, and what works best for each teacher and classroom is likely to vary.  My two favorite options, though, are below.  Please note that there are many other ways to set up Google Drive to work for your classroom assignment turn-ins; experiment to find what works best for you and your students.

Option 1:  Create a Google form for students to fill out in order to submit an assignment.  Create the following fields:

  • First name
  • Last Name
  • Class 
  • Assignment Link
Be sure to check the required question box for each so that students cannot submit a response without filling in all of their information.  Then send the form and share a link to it with your students.  Student responses will be collected as a spreadsheet in Google Drive, which makes sorting and accessing their submitted work a fairly easy process.

Option 2:  Create a shared folder for each student.  If your students will be submitting work via Google Drive on a regular basis, you might want to avoid creating a Google form for every single assignment.  Instead, have students create a new folder, title it (include class period, student name, etc), and share it with you with Can Edit rights.  Any documents that they create within the folder or move into it will automatically be accessible by you.  This means they never have to take an additional step to share their work, and you can also pop in to their documents to provide feedback as they work.


What apps should we be using?
The Chrome Web Store is packed with great apps for classroom use, along with plenty of mediocre ones.  Here are a few worth checking out:

Video editing - WeVideo and Pixorial
Flowcharts and mindmaps - LucidChart and MindMeister
Annotating videos - VideoNotes
Photo editing - Pixorial, PicMonkey, Pixlr

Do you have tips or questions about Google Drive?  Please share in the comments!


Laren Hammonds is an 8th grade English teacher at Rock Quarry Middle School.  She's @_clayr_ on Twitter and blogs about her classroom experiences at Game to Learn. 

Thursday, February 20, 2014

The Preservice Teacher and Technology

Preservice (interns) teachers that enter into the secondary classroom today grew up in an era defined by technology.  They have never lived in a world without technology; they know all there is about technology (supposedly). Although they have been immersed in the technology world they struggle with choosing and integrating technology into their instructional practices. They have not yet developed their pedagogical practice to know that you just cannot simply choose a technology and integrate it into a lesson.  There are many more pedagogical factors involved.

This places them at a crossroads.  They know technology but become stressed on how to integrate it into the classroom and why, at times, it doesn’t work the way they envisioned.


With the increase of national technology standards (NETS) and the movement toward teaching with 21st skills, the use of technology in the classroom is vital.  Despite the standards that have been adopted and the improvements to school technology infrastructures in K–12 institutions, preservice teachers are not always able to apply new technologies to enhance student learning, and one of the reasons cited has been insufficient exposure to new technologies in their teacher preparation programs (Angeli & Valanides, 2005; Buckenmeyer & Freitas, 2005; Koehler, Mishra, & Yahya, 2007; Niess, 2005). 

The students do take technology courses (i.e. CAT 200 at the University of Alabama) and are exposed to new technologies, may have a lesson modeled for them, but an inadequacy comes in that often they must figure out on their own how to use the technologies and how to integrate the technology into their classroom instruction.  As hard as professors try, the reality is that the required curriculum does not leave much room for the introduction and experimentation with the technology within the class time.

So, what can classroom teachers do to help the preservice teachers?  There are several tips that should prove helpful in providing support to the preservice teacher.
  1. Welcome the knowledge they have.  Preservice students are already apprehensive about teaching.  They want everything to go just right and be exactly what the classroom teacher wants.  They struggle sometimes in showing their own strengths.  As a classroom teacher, you could be more open and willing to allow them to “try out” their technology lessons.
  2.  Support the attempt.  As a classroom teacher, mentor.  The one thing a preservice teacher does not like to hear (in reality who does) is the phrase, “It will never work.”  Although you may have that knowledge as an experienced classroom teacher, provide the preservice teacher with constructive criticism and help them grow in confidence and ability.   You have to live and learn sometimes.
  3.  Share your knowledge. Classroom teachers have a plethora of knowledge from their years of experience.  Share this knowledge with the preservice teachers.  Teach them what you know – the good, the bad, and the ugly.  Be realistic with the preservice teachers regarding your uses of technology in the classroom.  They need to know that it does not always work the way one envisions, but that learning can fail forward.
  4.  Be sustaining. Choose 1-2 tools each month that the preservice teacher can learn and incorporate into classroom instruction.  By introducing and supporting the use of 1-2 tools each month you are helping build a repertoire of tools for the preservice teachers.
Yes, the preservice teachers might be digital natives, but there is so much they still have to learn regarding the TPACK method of teaching.  With the proper guidance, the preservice teachers will learn the practical skills that will enable them to successfully instruct their students in developing 21st century skills.

Tuesday, February 18, 2014

Helpful Sites

I'm blogging from a train the trainer workshop for the Alabama Learning Exchange.   ALEX has a new tool available to Alabama educators called "Learning Assets."  A Learning Asset is a strategy a teacher chooses to actively engage students in learning a concept or skill using a digital tool/resource.  This resource is helpful for finding strategies to help teachers meet learning objectives.  To utilize this tool, go to http://alex.state.al.us and click the "Learning Assets" tab.  You may search by content and grade.  It's a treasure trove of tech tools.  You'll find everything from videos to webquests to podcasts.  Please email me if you need help navigating ALEX.

This afternoon, I attended a session about web based tools.  One of my favorite sites for creating word clouds was AnswerGarden.  In this site, the teacher creates a question and students answer with a word or small phrase.  It's very similar to other word cloud sites, like Wordle, but I found it to be so super user friendly that it became one of my favorites.  You may find this at http://answergarden.ch.

Please let me know if I may help you in any way!

Shannon


Saturday, February 8, 2014

Weekend Links for February 8

One of this week's posts, "The 'S' Word" by Erik Hammonds, addresses the issue of streaming content in the classroom.  This installment of Weekend Links offers some resources for learning how to make video and music available offline for classroom use.

12 Great Ways to Download and Convert YouTube Videos for Your Classroom via Tech the Plunge

On YouTube You Can Now Find Free Music to Legally Download and Use via Free Tech for Teachers

Do you use a music service? Here are guides for listening offline via Spotify Premium, Google Play, and Rdio.

Do you have tricks for accessing content without streaming?  If so, please share them in the comments!


And in case you missed them, here are a few more of the latest TCS Tech posts:

International Safer Internet Day by Lavanda Wagenheim

Middle School Does Not Suck by Andrew Maxey

Friday, February 7, 2014

The "S" Word

Streaming is kind of a touchy subject. I've had a lot of people ask me why it’s such a big deal if they want to stream something from YouTube for their classroom, and to be completely honest… it isn't.


What makes it a big deal is when everyone wants to stream from YouTube and Spotify and Pandora and Vevo and Google Play and iTunes and Netflix and Amazon Prime all at once and all the time. Add in the fact that the students are streaming music and videos all on their own in practically every lab in the school system, and you might start to see why it becomes an issue.

The reason that it’s a big deal is pretty simple. At home, you pay your ISP a certain amount of money each month for a certain amount of bandwidth. It's probably plenty for you and your family, and you never top it out. That’s essentially what we do as a school system, only instead of paying Charter or Comcast we pay Alabama Supercomputer in Huntsville, and we have the capability to use way more than our limit.

The old metaphor about the internet being the "information superhighway" is equally cheesy and -- as much as this hurts me -- accurate. When we get online, we get in our digital car and we head out on the road.


Here’s where the analogy gets weird, though.


Say you’re not doing much online… maybe checking your email or the weather so you'll know how much milk and bread to buy, for example. At that point, you’re driving a smart car on the highway. You’re not taking up much room, you're just minding your own business doing your thing. Now, imagine an entire class of students has just pulled up YouTube in a lab. Your smart car is now competing with 30 semi-trucks that want that same piece of highway. The road isn't getting any wider; you've just got to share it and find some way to fit. Everything slows down, and in the end no one is getting anywhere.


That’s essentially why we limit and/or discourage streaming. It’s certainly useful when it’s needed; those trucks on the highway are frequently carrying lots of important stuff. The problems start when everyone is driving one. There’s just no room for anyone to get around, and ultimately, traffic grinds to a halt. The difference between the internet and the interstate is that often instead of blaming all the people driving around in those huge trucks… the road just gets blamed for not being wide enough.

In a perfect world, we'd live without bandwidth limitations, speed limits, and calories. Until that day comes, though, try to do what you can to make sure that you and your class aren't a gang of truckers. If you want some advice on how to limit the amount you need to stream for your classes, let us know and we'll be glad to give you some advice. If everyone shares the road, we can all drive that much faster.

Erik Hammonds is a computer tech for the Tuscaloosa City Schools.